
OpenLase is designed to work with typical DIY laser scanners that use sound cards as DACs. This is the first laser projector that I built to go along with it. It is by no means perfect, and indeed, quite a few things could be improved. It’s relatively simple though, and it should be straightforward to duplicate.
Overall view
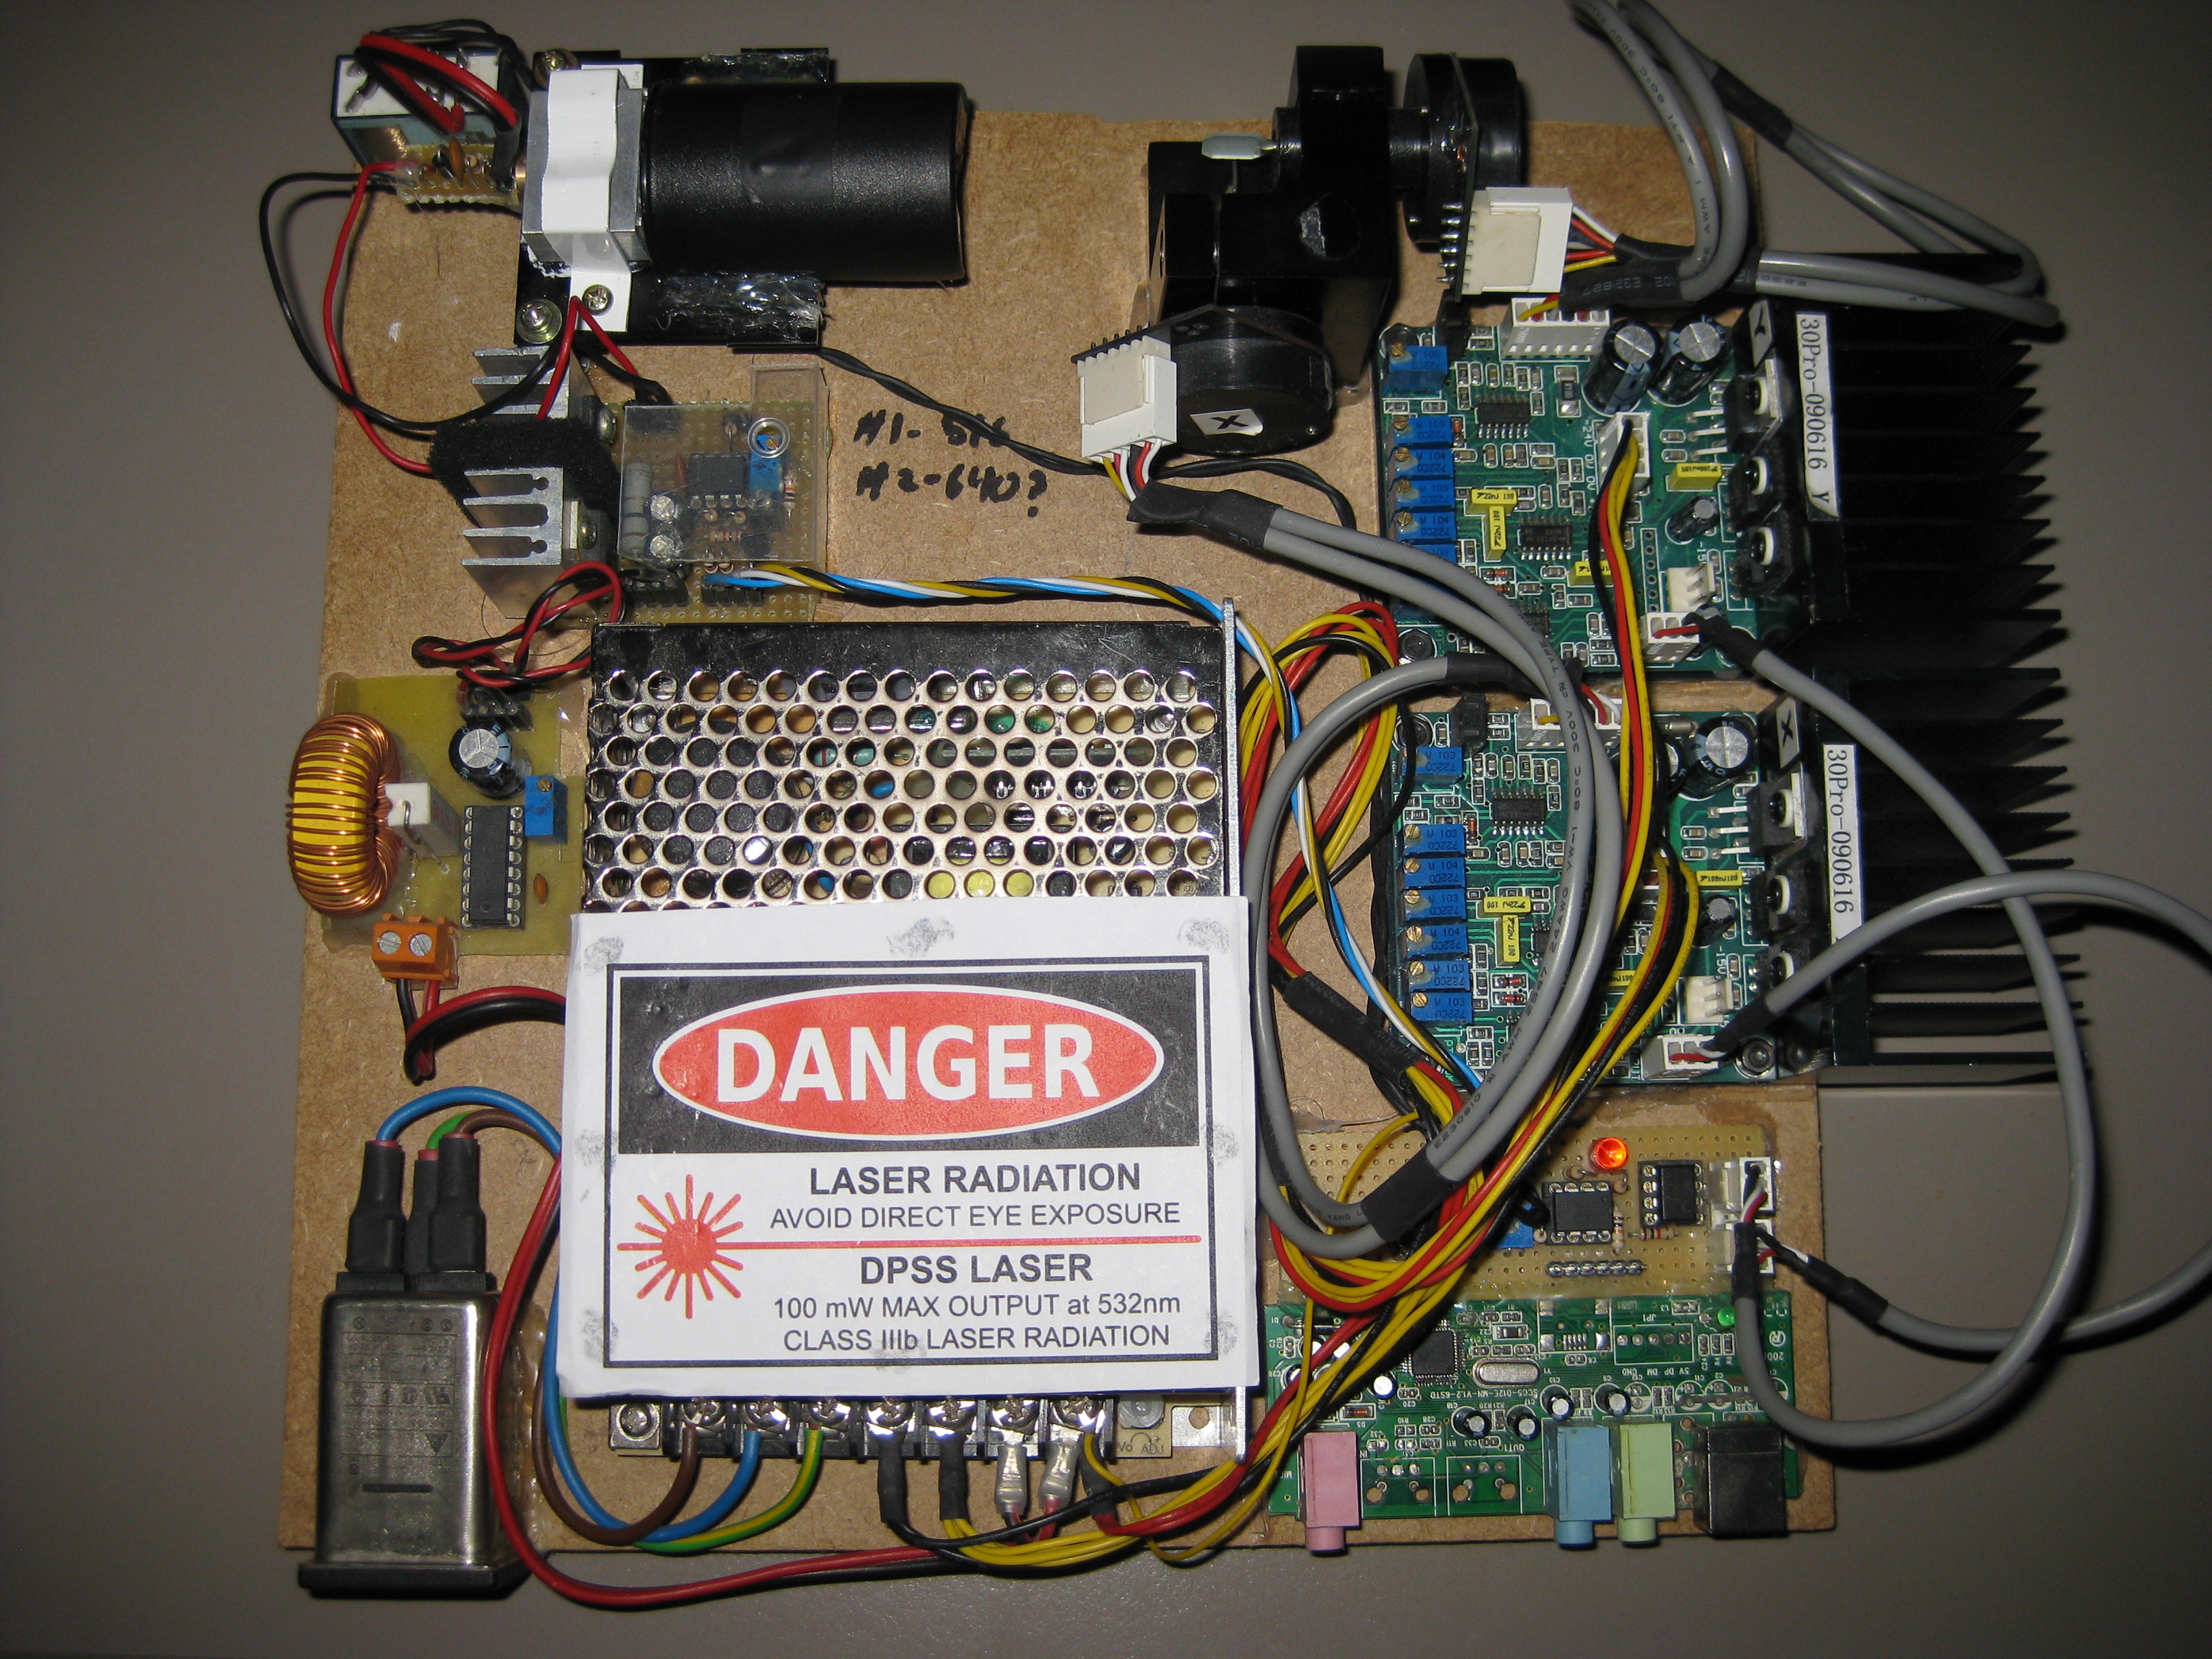
Overall view
There are four main parts to the scanner: the digital-to-analog converter (DAC) (and associated control circuitry), the emitter subsystem, the scanning subsystem, and the power supply.
DAC board
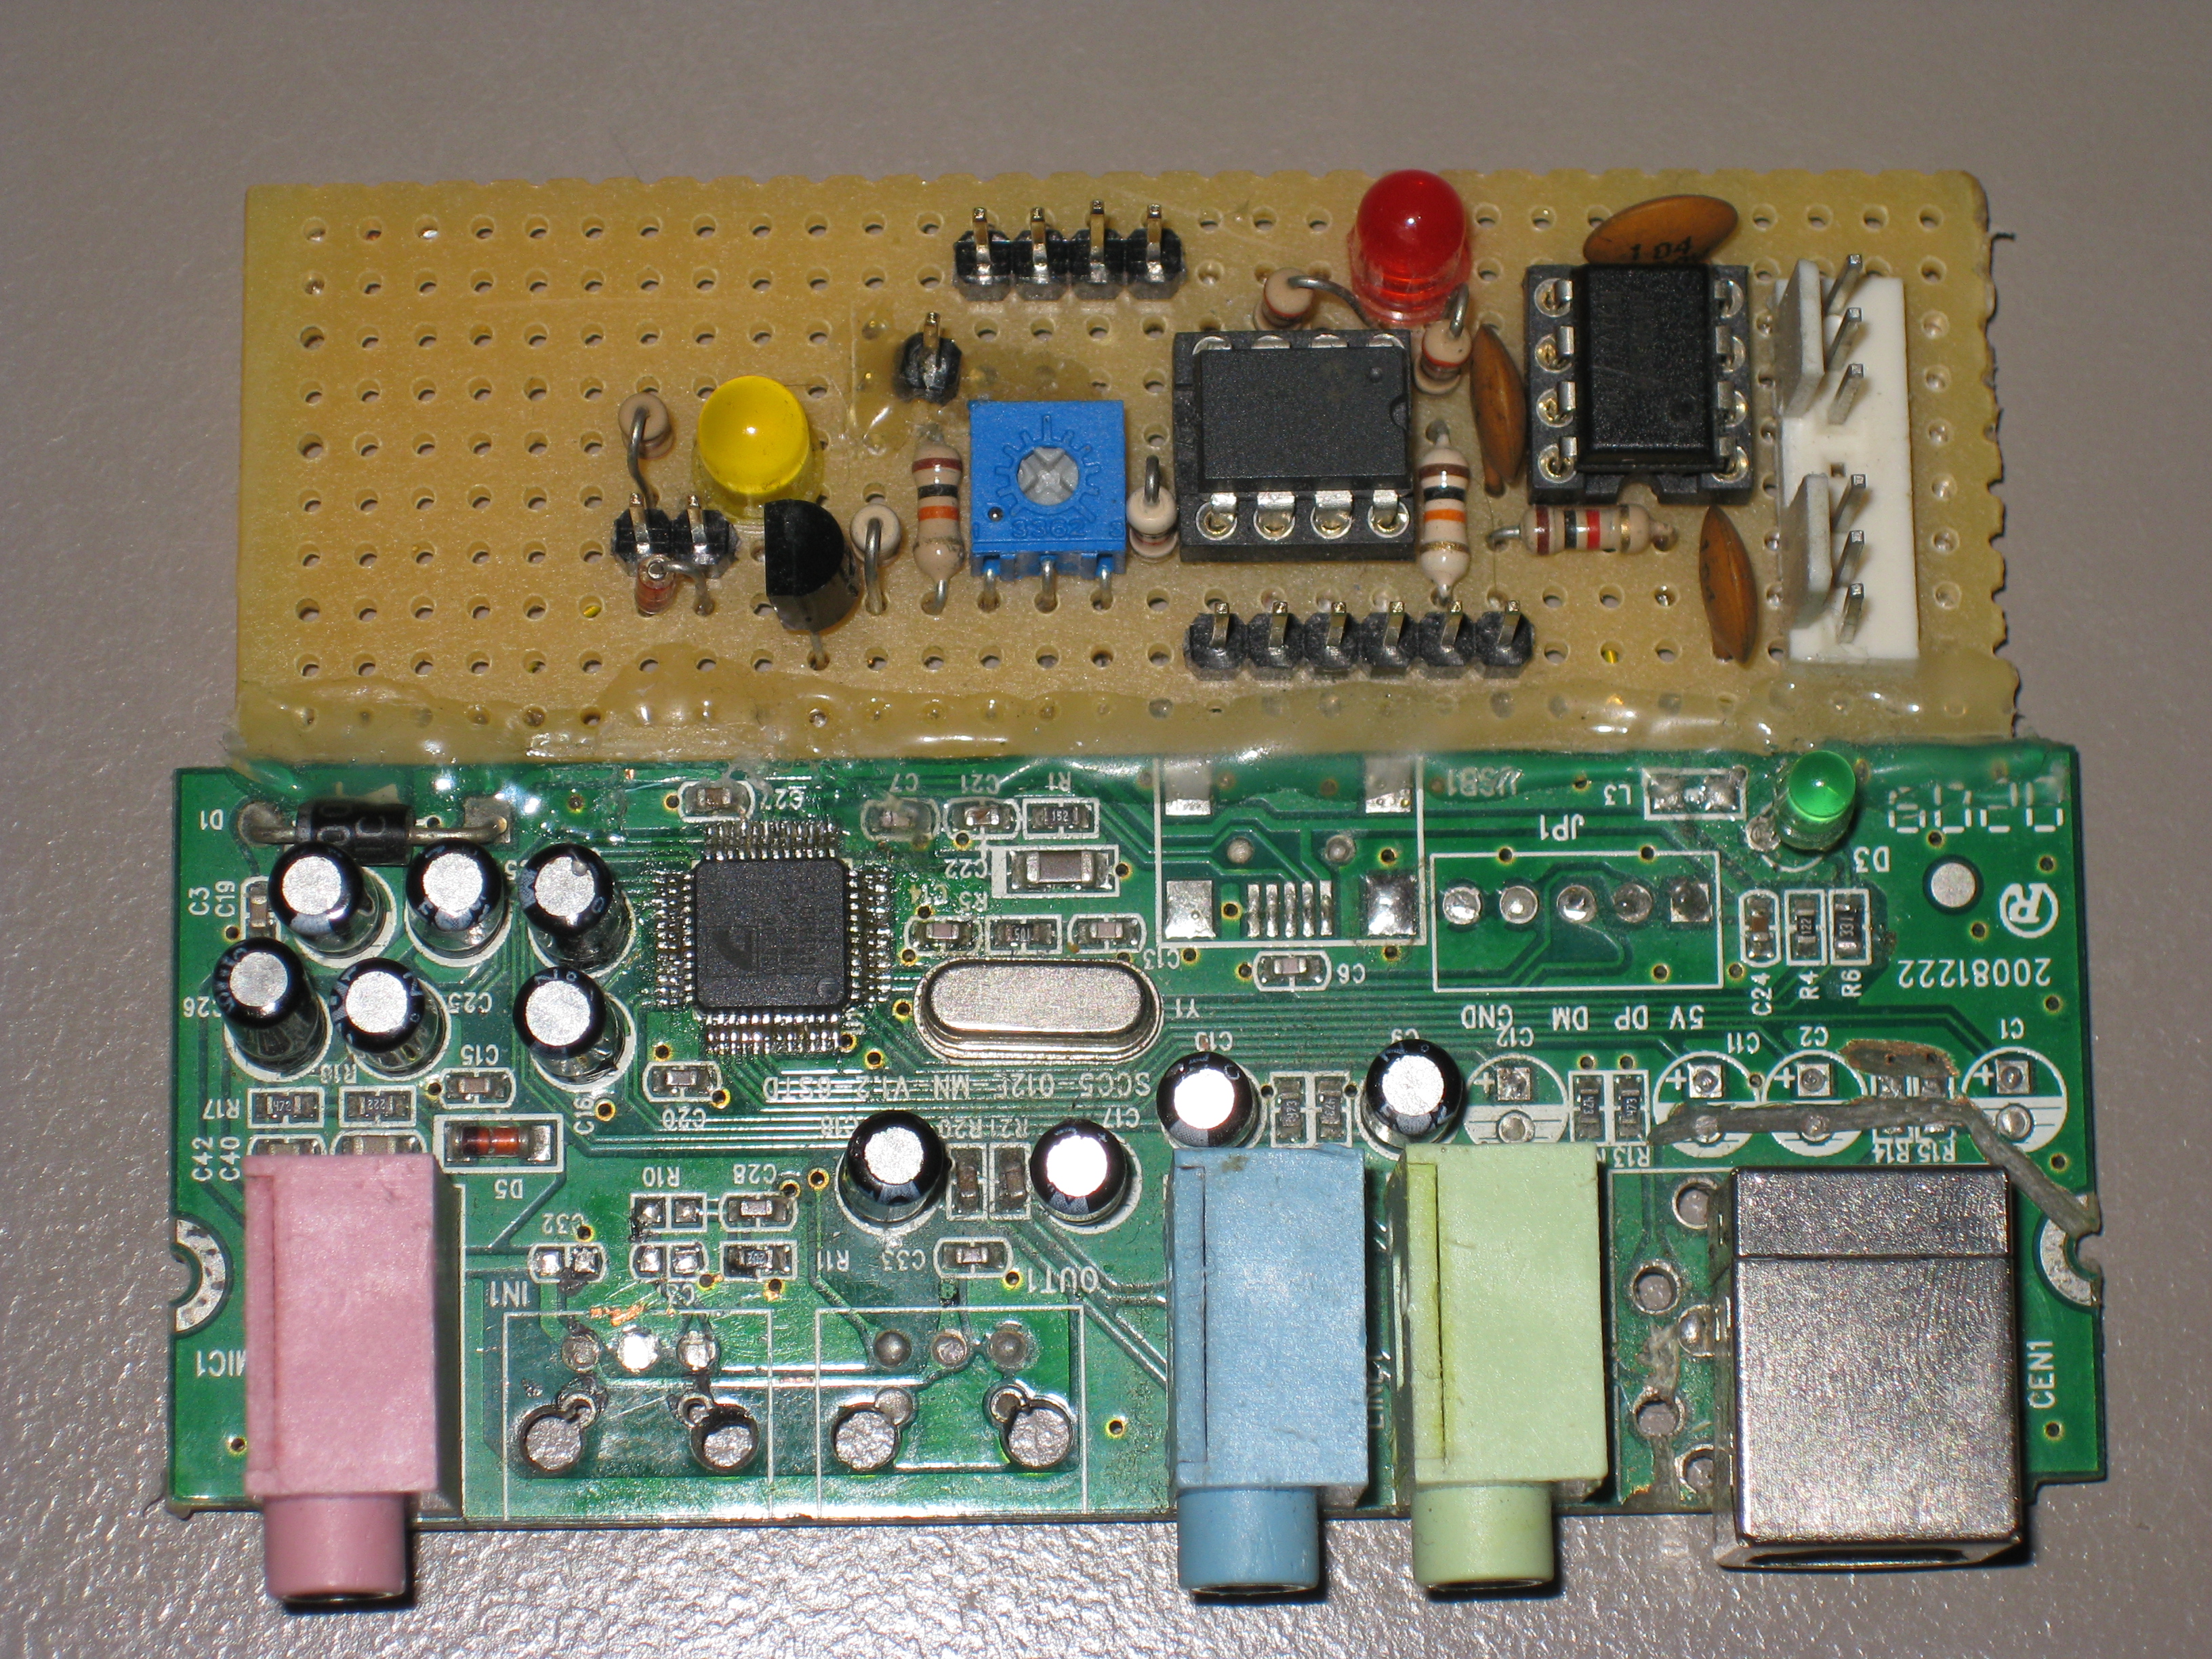
DAC board
The DAC is a modified 5.1-channel USB sound card. I’m using all 6 channels as follows:
- The first two channels are left unchanged, for stereo audio output
- 2 channels for X and Y
- One channel for the green laser’s brightness modulation (G)
- One pilot channel for the safety controller (E)
This particular model actually has an 8-channel C-Media chip, so two extra channels are available on the chip’s pins, although they are not brought out on the board. I plan on using these whenever I get around to adding blue and red lasers for RGB output. There’s also an audio input (microphone + line in), which is also left untouched for realtime audio visualization functions. In effect, the laser not only outputs the actual scanned image, but also serves as the system’s stereo audio input and output. This makes it very easy to use a single sound card in JACK and do everything synchronously (if you try to use two sound cards at once, you need to deal with the fact that their sample rates will inevitably drift), and also means that audio output and laser output are precisely synced, with no lag between them.
The board has been fairly heavily modified: I removed the miniUSB connector, replaced it with a standard USB B connector on the other side, removed some jacks, and added the unpopulated status LED. However, the only important modification that needs to be performed is to bring out the four laser channels before the AC coupling caps. Audio is AC coupled and the human ear can’t hear anything below 20Hz or so, but the laser needs the frequency response to extend down to zero. Thankfully, the DAC chip itself does output DC without any issues. There’s also one other issue to deal with: since the USB sound card runs off of a single supply rail (0V to 5V), the DC output from the DAC actually has its “zero” value somewhere in between – this doesn’t matter with AC coupling, but becomes important with DC coupling. This “zero” reference value is actually present on a pin of the sound card chip, which we’ll also tap.
Here are the connections to be made on the sound card:
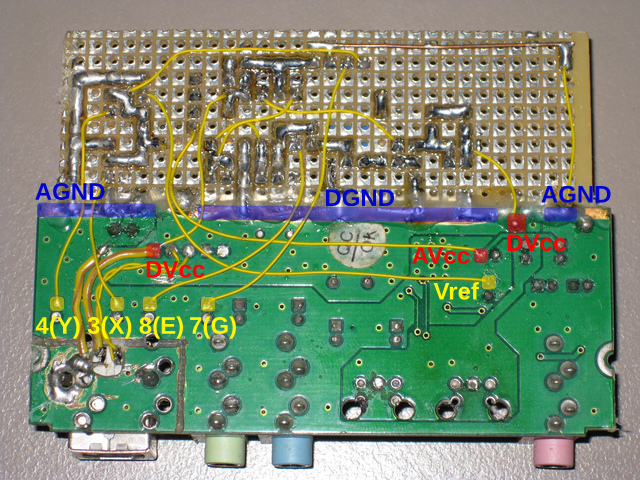
DAC back
So we need to subtract the reference voltage from the audio output. Thankfully, we can do this “for free”. The amplifiers for the galvanometers use a differential ILDA input, but we have a single-ended signal. We can just feed the reference to the (-) input, and the signal to the (+) input, and the amp will perform this subtraction for us. Obviously, this isn’t a real differential signal, but it works just fine. There’s one catch: the reference voltage from the card has almost no current drive at all (it probably comes straight from an internal zener reference), so it needs to be buffered with an op-amp before using it.
Another issue is that the voltage levels from the sound card are lower than standard ILDA voltage levels. My galvos have an input scale adjustment that can be turned up enough that I can get a wide enough scan (enough to exceed the maximum width at which they can display the standard ILDA 30k test pattern accurately). If you run into issues such as these or you want a more robust solution, you might want to invest in a soundcard DAC correction amplifier (or build your own).
So, that covers the scanning. However, there’s a whole bunch of stuff on that perfboard glued to the sound card! The extra circuitry is a safety controller. Here’s the complete schematic:
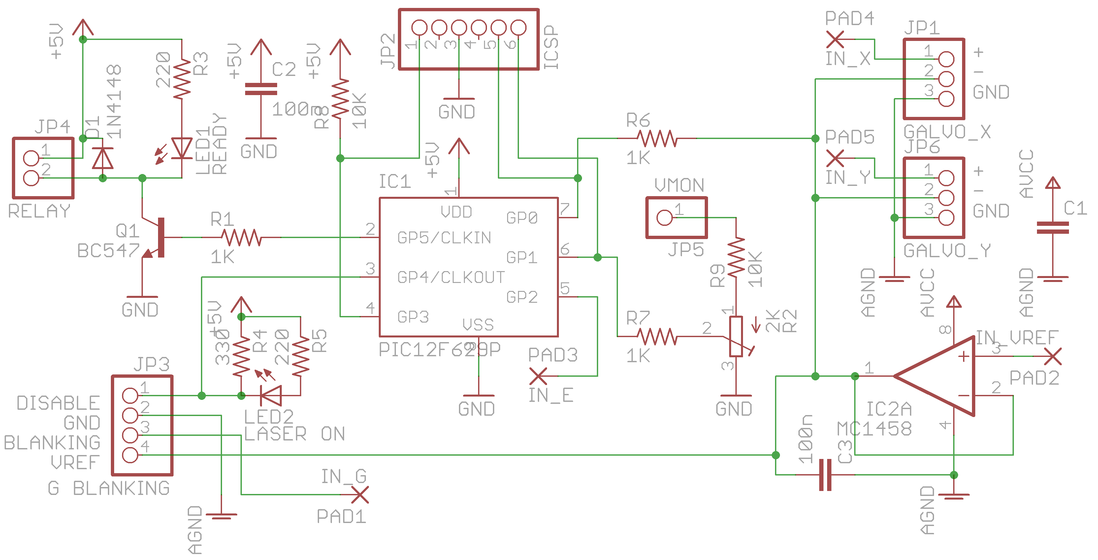
DAC schematic
A small PIC12F629 microcontroller performs two tasks: ensures your eye safety if the PC software crashes or hangs, and ensures the laser’s safety during power transients. Here’s the code.
The primary unsafe failure mode of a scanner such as this is a software crash: if the software hangs or crashes with the laser on, it will remain stationary at full brightness, which is the worst possible situation. The sound card likes to keep its outputs active if the software shuts down, it doesn’t automatically clear the DAC values to zero. I solved this by dedicating one channel of the sound card to a 1kHz square wave, which is generated by the OpenLase output module, which is also responsible for ensuring that the output projection is safe (although right now that part of the functionality is incomplete). By monitoring the 1kHz tone produced by OpenLase, the controller can safely shut the laser down at most 500µs after a software crash.
The second task is needed because I did not explicitly design my laser driver to be safe during power transients. Laser diodes are notoriously flimsy and will die a horrible death from short power transients or ESD discharge. Usually you can design the driver not to suffer from these issues (and in fact, I don’t know if mine does or not), but I opted for a brute force safe approach. A normally closed relay across the laser’s terminals shorts it out by default. The PIC monitors the main power supply rail, and only opens the relay when power is stable for 1 second. When the power is turned off, the supply rail begins to drop and the PIC quickly shorts out the laser. The actual monitoring is carried out by the PIC’s built-in analog comparator, comparing an adjustable division of the power rail against the sound card’s reference voltage.
This is a similar concept to the relays used in audio amplifiers to isolate the speakers during power-up, to avoid the “thump”, except the relay is across the laser (not in series with it) because the driver is a constant current driver (which is perfectly happy with a shorted output). As a bonus, the relay protects the laser from ESD during transport.
It’s worth noting that the DAC/control board is powered entirely from USB. When it is powered down but the PSU is powered up, the only negative effect is that the DISABLE output to the laser driver is low (enabled); however, in this situation the blanking voltage is zero, so the laser is off anyway. I usually power up the control board first (via USB), set up the software, with output disabled, then apply main power to the scanner and turn on output.
Scanning subsystem
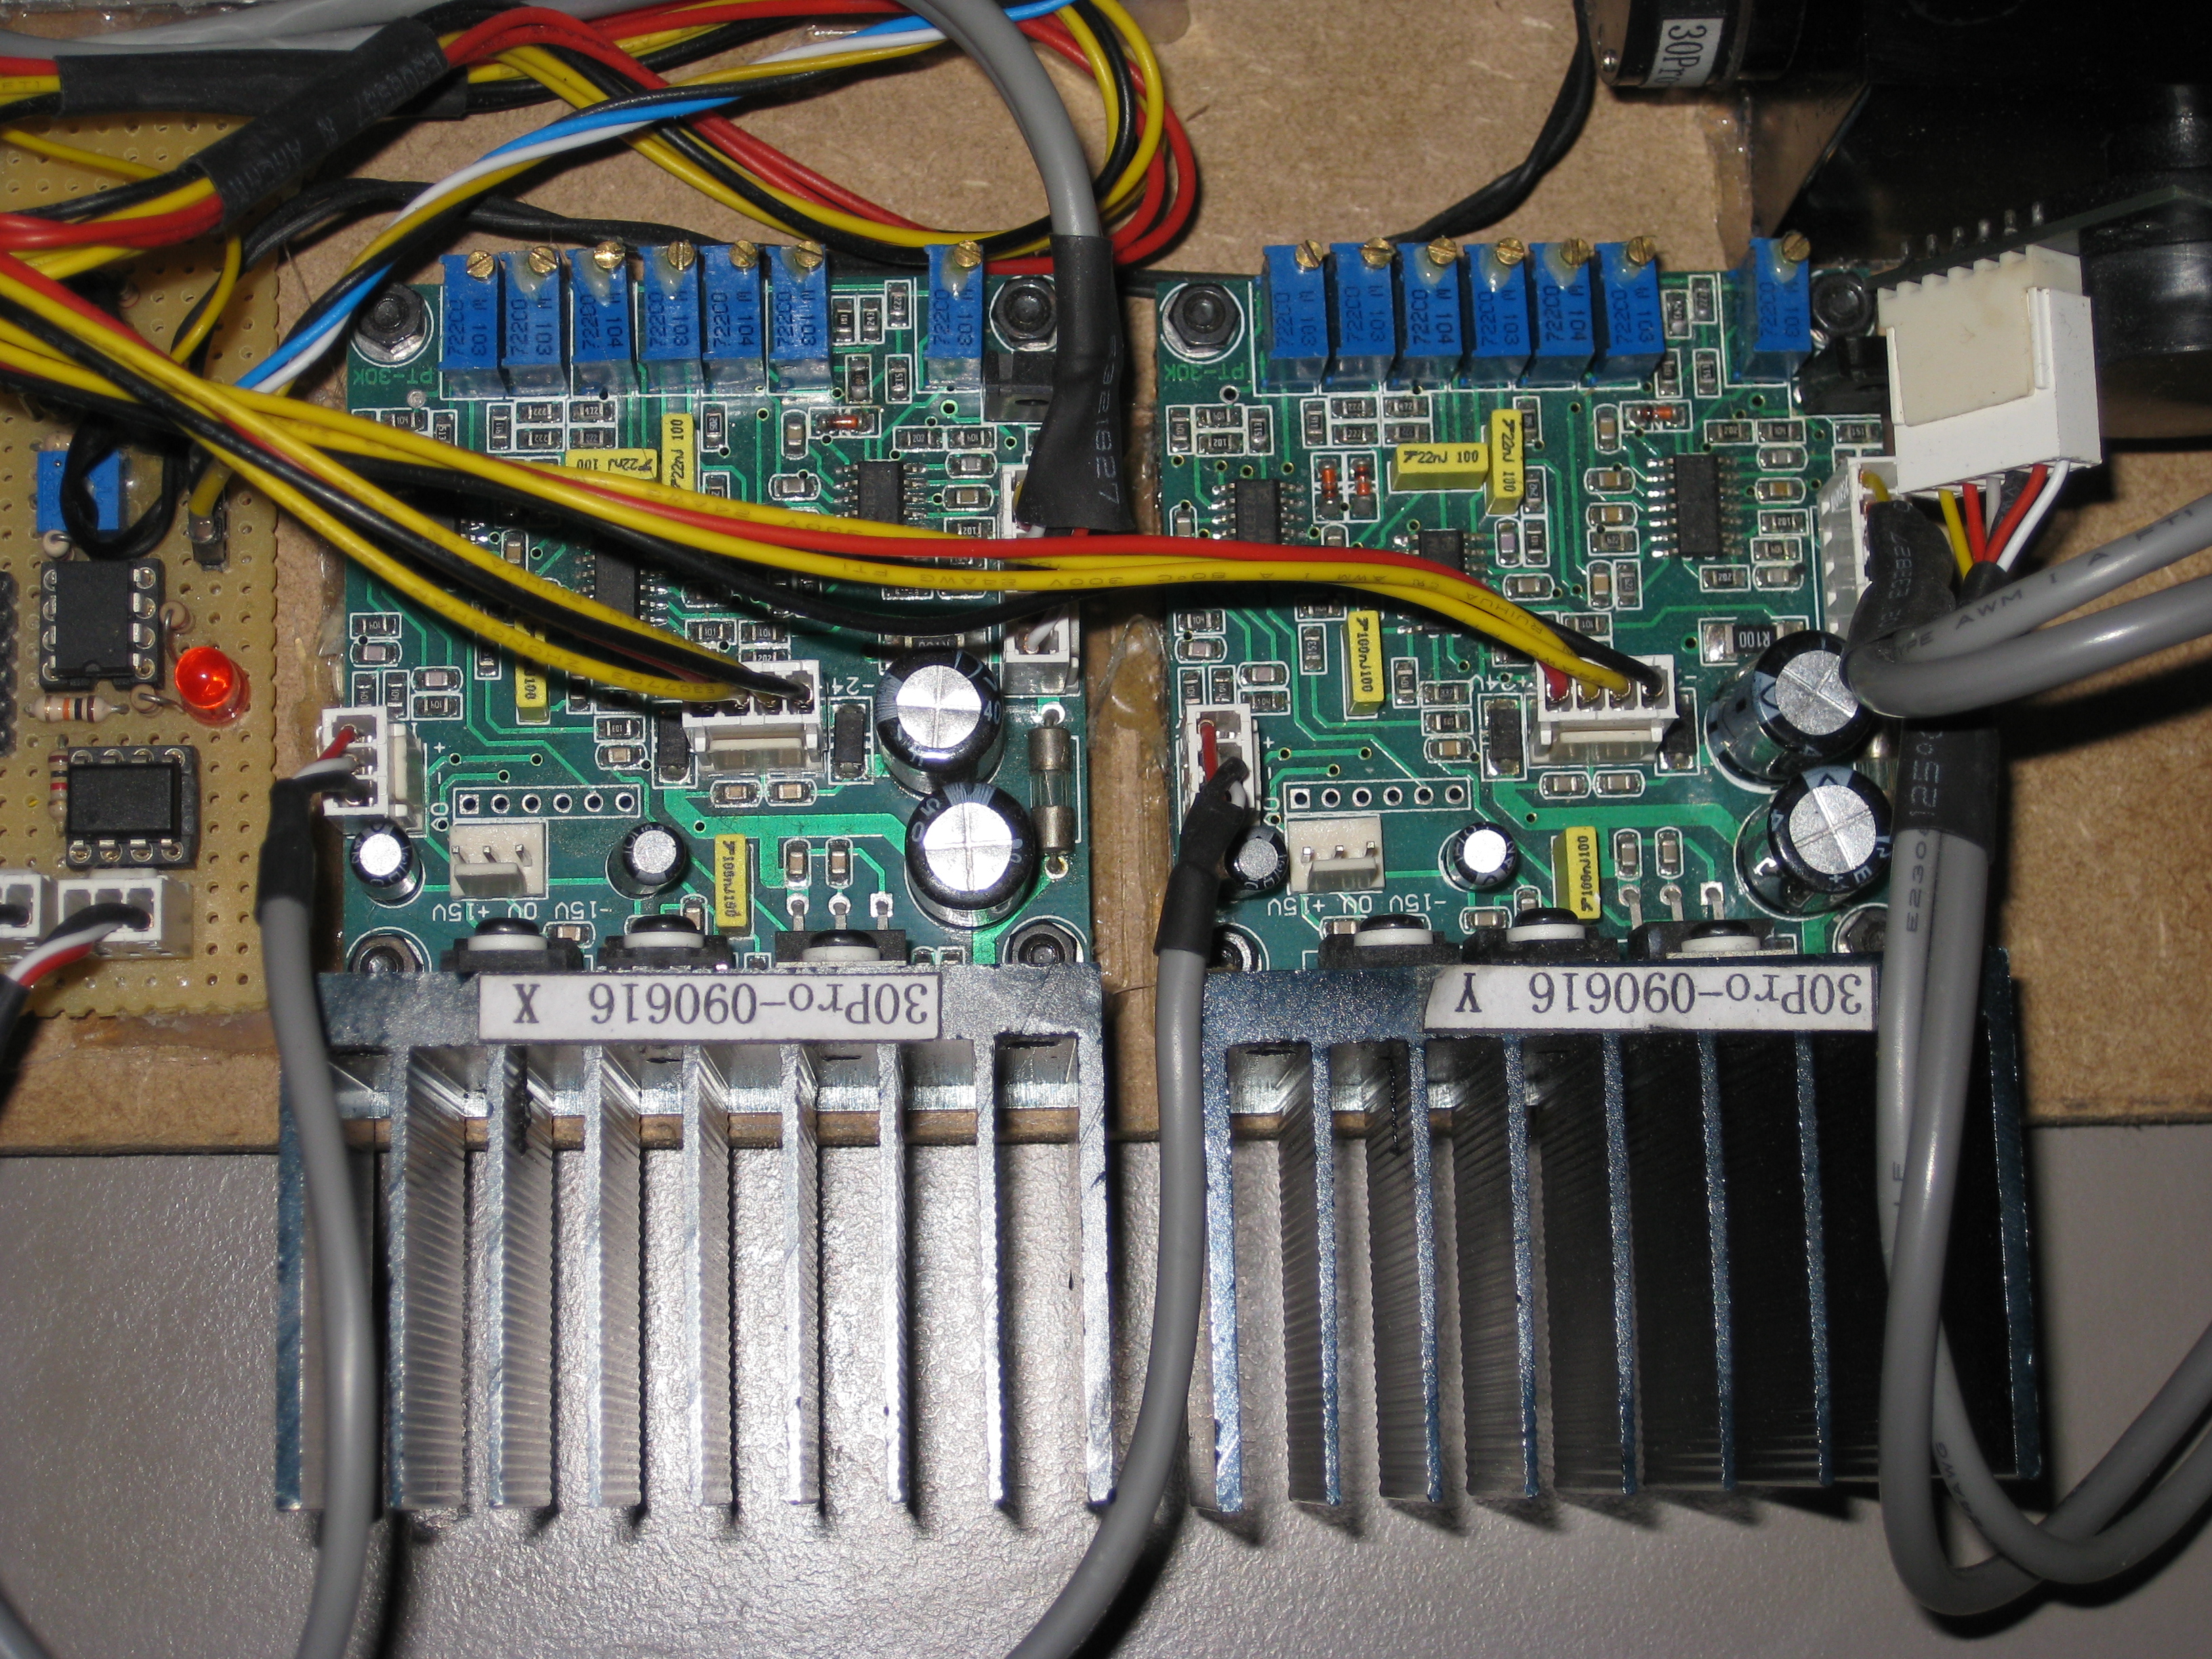
Galvo amps
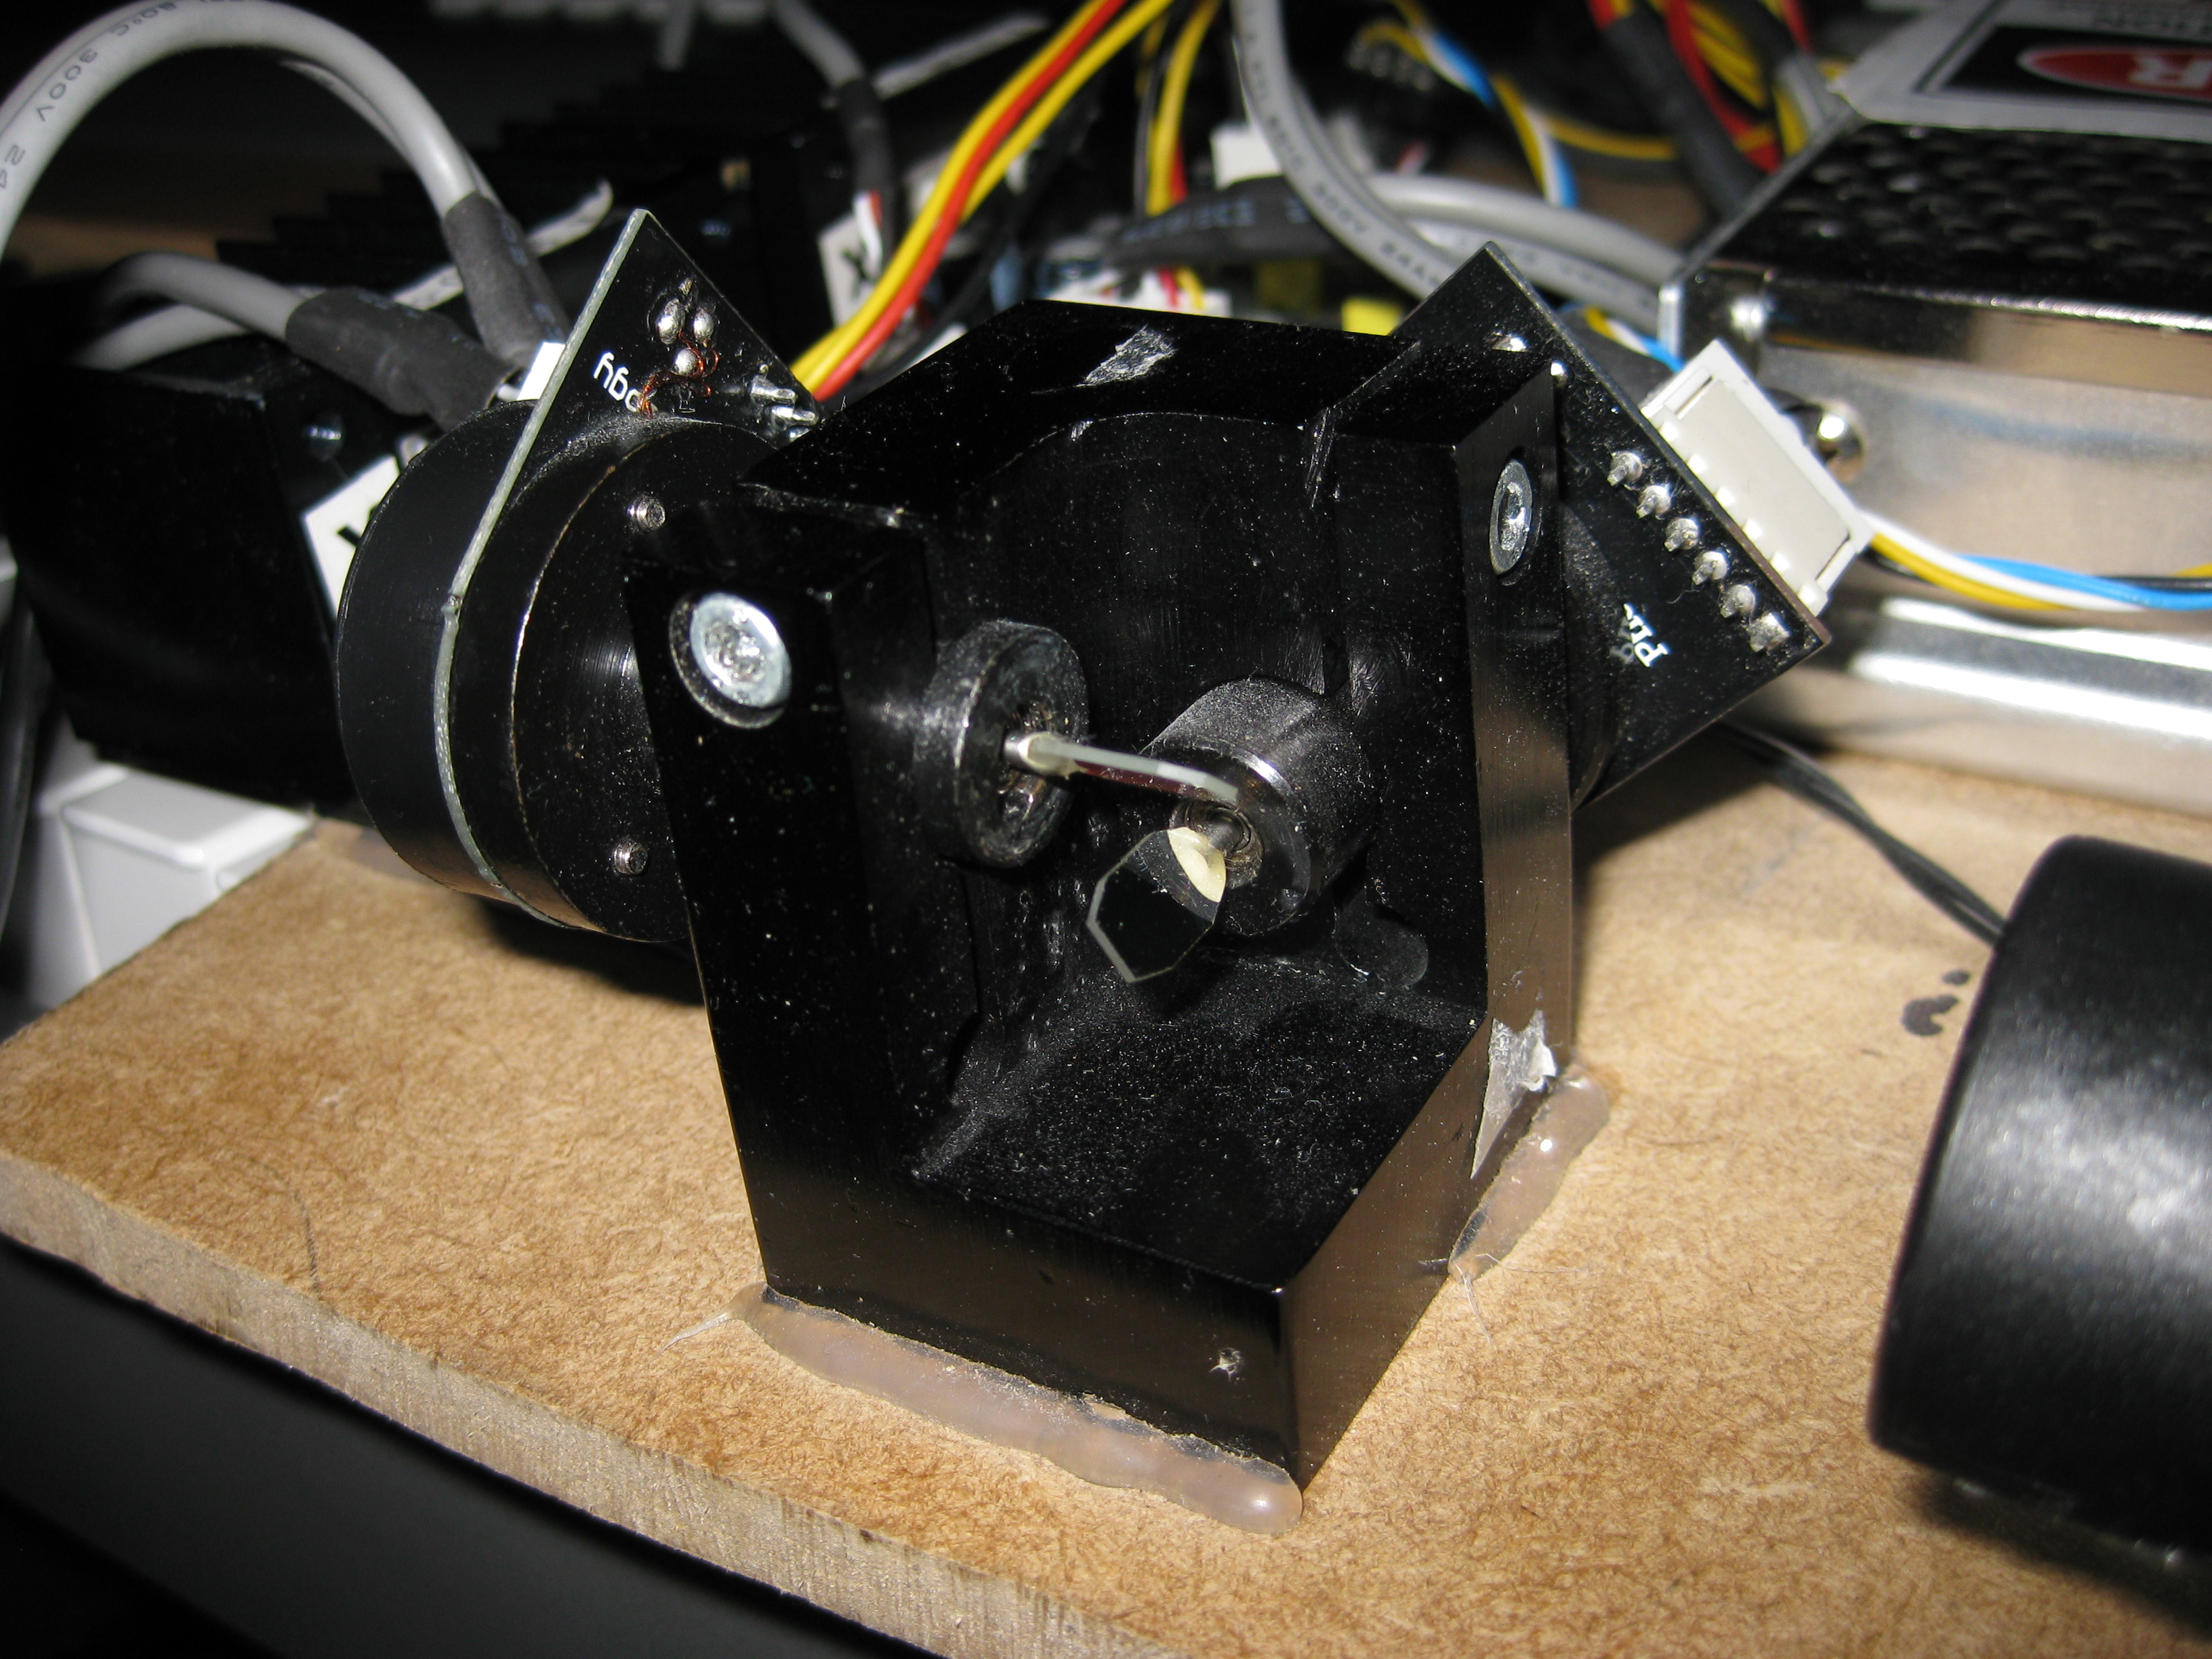
Galvos
The scanning portion consists of off-the-shelf galvos and amplifiers. The concept is pretty simple: the laser enters on one side, bounces off of one mirror to control one axis, then off of another mirror to control the other axis, and exits at a 90° from the input. I bought these as SCANLSP-30 from eBay, but they are no longer available under that name. Nonetheless, they’re still available straight from the manufacturer as PT-30K. They used to call themselves Phenix Technology, but apparently now go by SpaceLas. Here’s someone who appears to be selling them.
These come factory tuned to 30kpps ILDA standard, so if you’re new to lasers you shouldn’t change any adjustments other than the input scale (size). However, they can be tuned just like any other galvo scanners (google for tutorials; for process control nerds, the galvo amps are basically PID servo loops and are tuned in much the same way). To move the output image, just physically rotate the galvos in their mounts. There are no adjustments for inversion, rotation, or perspective transforms. Instead, you do all of that from the OpenLase output control panel.
These are by no means the only galvos that will work. The only thing you need to be careful about is the aforementioned voltage difference between the soundcard output and a true ILDA signal – some galvos might produce a very small picture with this kind of trivial setup.
Emitter subsystem
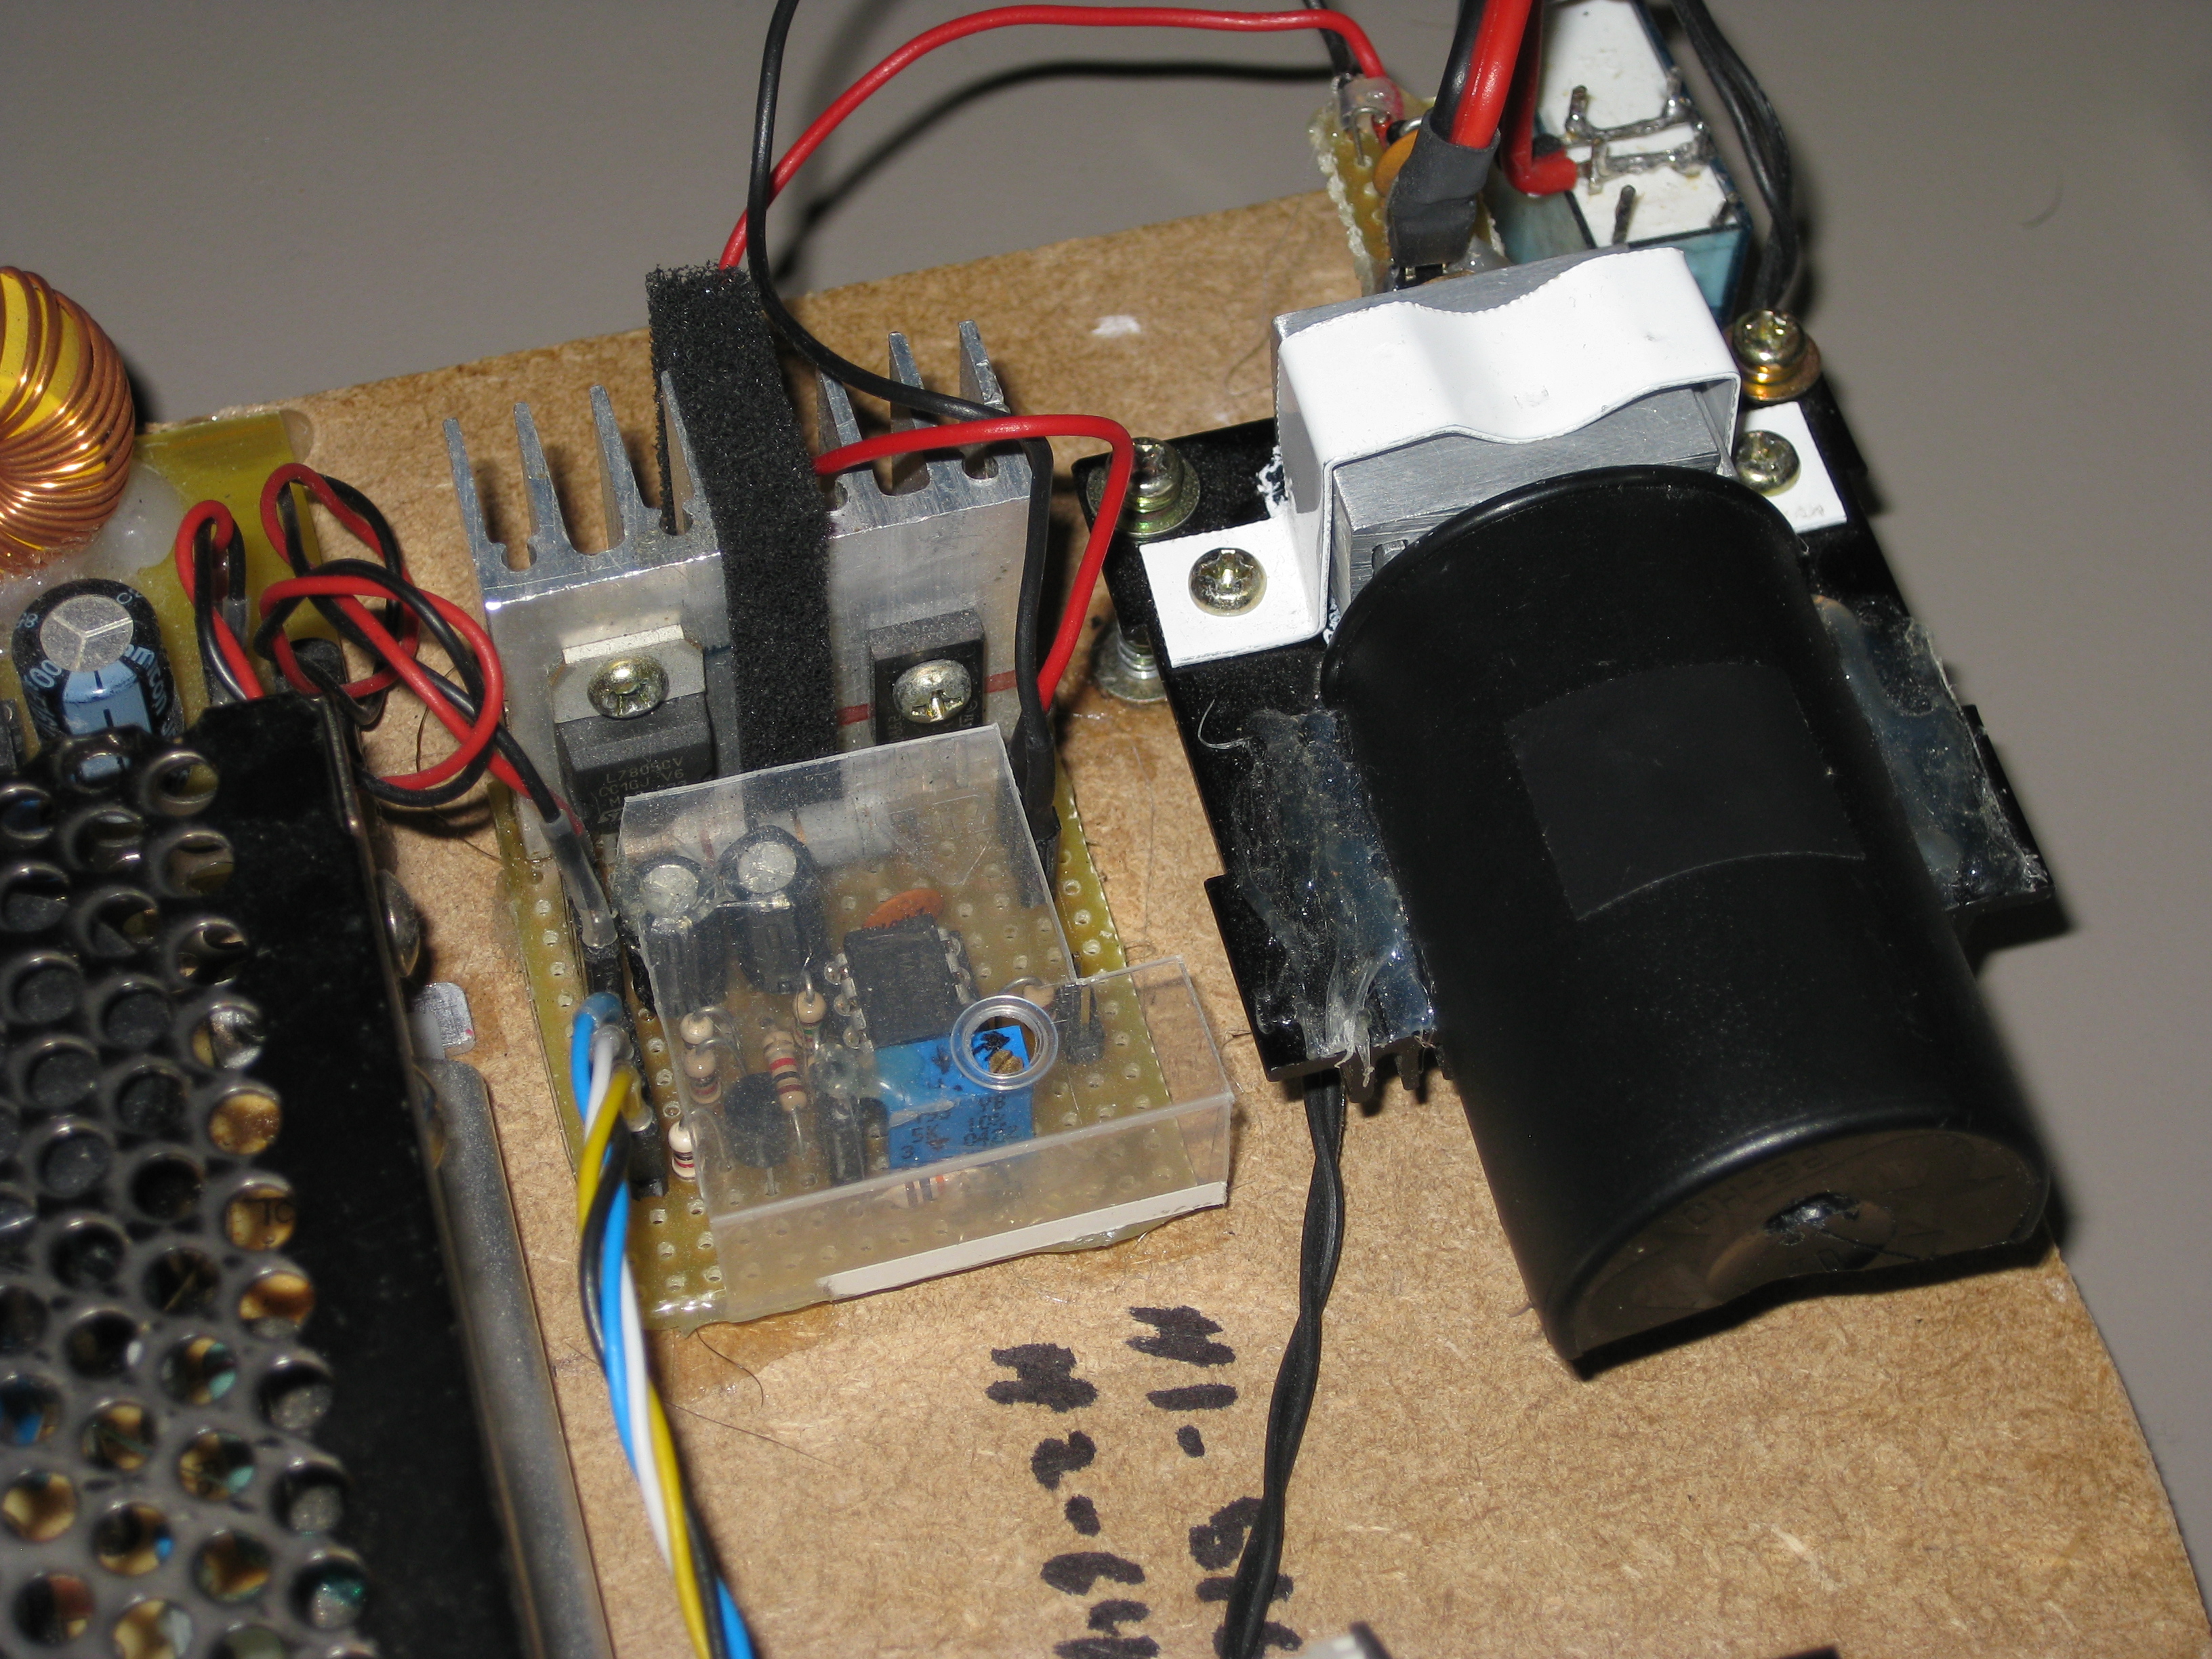
Laser and driver
The laser is a 100mW laser pointer (actual output power is circa 70mW), without the original driver and case. You can also buy these without the case, as a “module”, which is more convenient.

Laser (front)
It should go without saying, but 100mW is more than enough to cause permanent retinal damage (i.e. blind you) in a fraction of a second. The scanned output is relatively safe since the beam is spread over a long path, but the stationary beam is quite dangerous. You absolutely need to get some safety glasses.
There’s one extra catch: these Chinese pointers don’t come with IR filters, and the IR that they put out will happily go through goggles designe for 532nm green protection. Thus, you should add an IR filter to your setup as early as possible during the build process. I took mine from an old video camera, and it’s mounted within the black shield (it’s the bluish disc).
Laser (back)
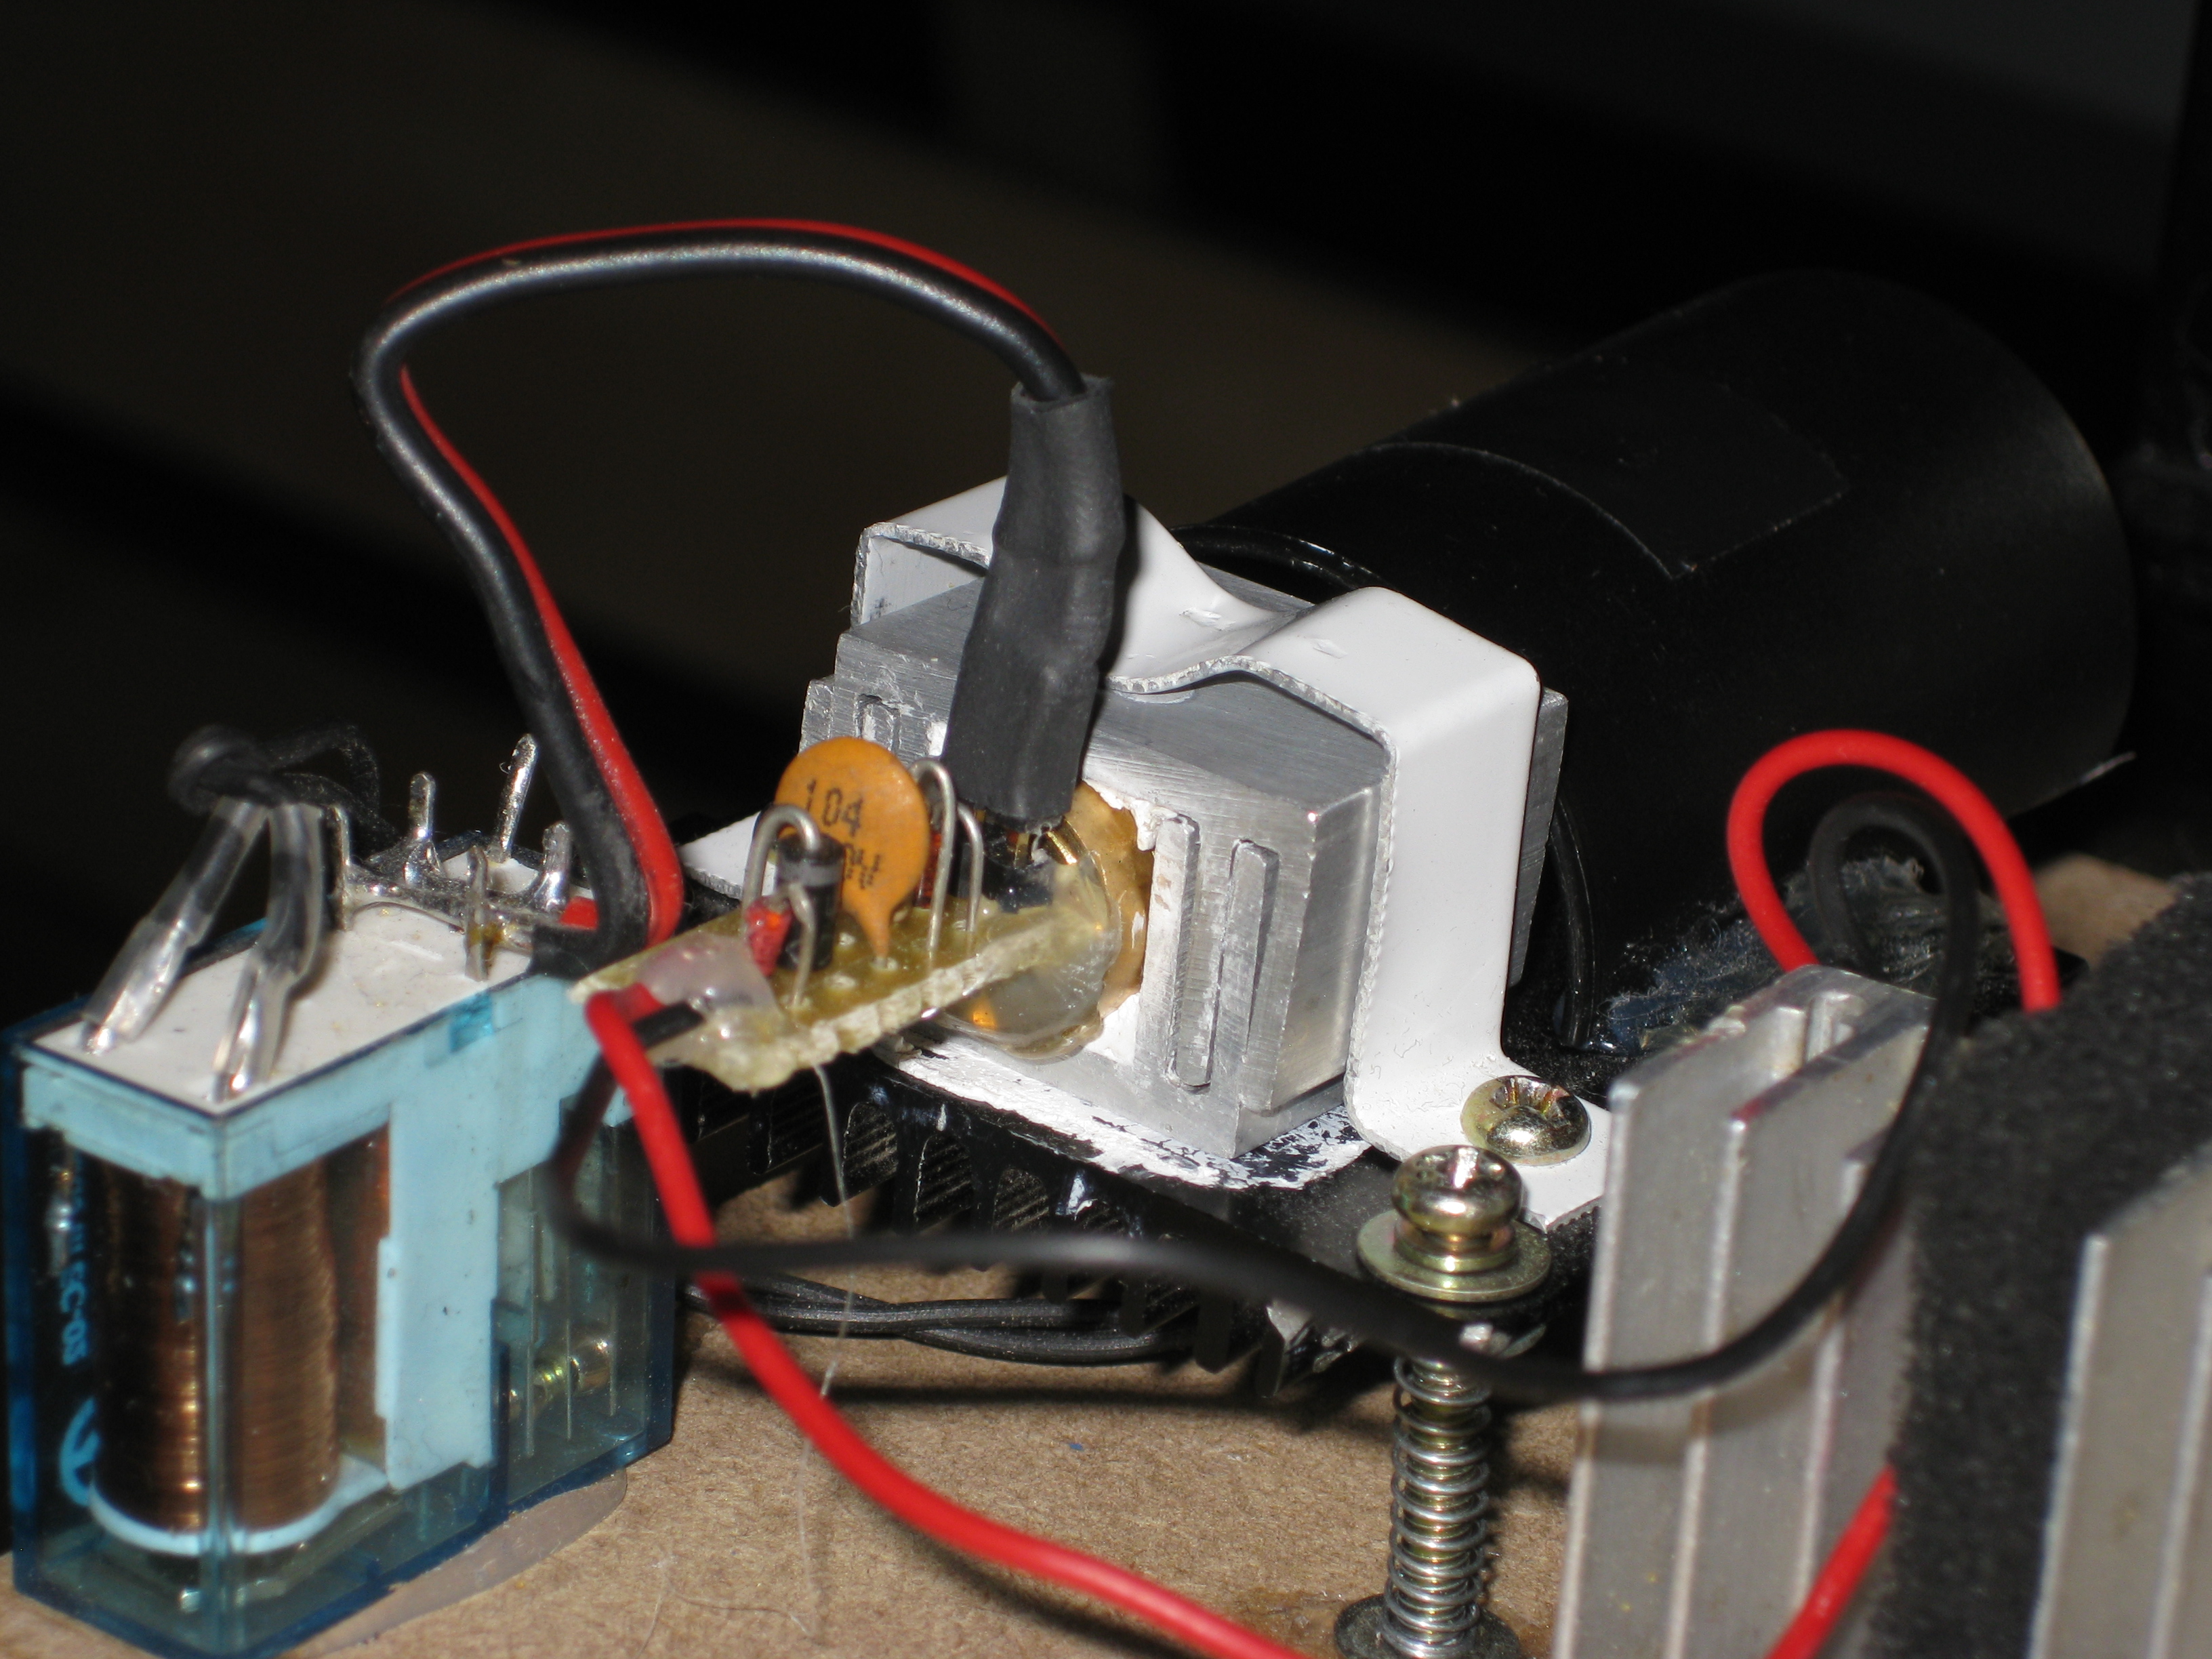
The laser itself is mounted to an old Pentium heatsink. It gets uncomfortably warm without any heatsinking, but any old hunk of metal properly coupled to it should be enough to keep it at a reasonable temperature. If you go for a higher powered laser, obviously you’ll want better heatsinking. As you can see in the picture, I used two interlaced TO220 heatsinks to wrap around the round body of the pointer, filling in the gaps with thermal paste, and then mounted that onto the main heatsink with a spring clip. The main heatsink itself is mounted onto the base on adjustable screws with springs. This lets me orient the laser to point at the galvos by adjusting the screws (vertically) and twisting the laser around on the heatsink (horizontally).
You should keep in mind that the quality of these cheap chinese pointers is highly variable, especially when you drive them with varying current. Some will oscillate strangely at lower powers, some like to have a warm-up period before they work properly, some switch lasing modes, and some just are just inefficient and need a lot of power (and produce a lot of IR!) for the same green power output. Unfortunately it’s a lottery, but thankfully they aren’t terribly expensive so it might be worth buying two or three, picking the best out of the bunch, and keeping the others around as spares.
The electronics on the back are some minor filtering to attempt to protect the diode from issues. Protecting diodes electronically is a black art and there’s no best solution (although some people seem to have gotten pretty good at it). I just threw together some parts that felt like they might make a difference while not affecting normal operation. At the very minimum, you’ll want a reverse biased diode across the laser to absorb any reverse voltage transients, and make sure you design the connector in such a way that you can’t plug it in backwards.
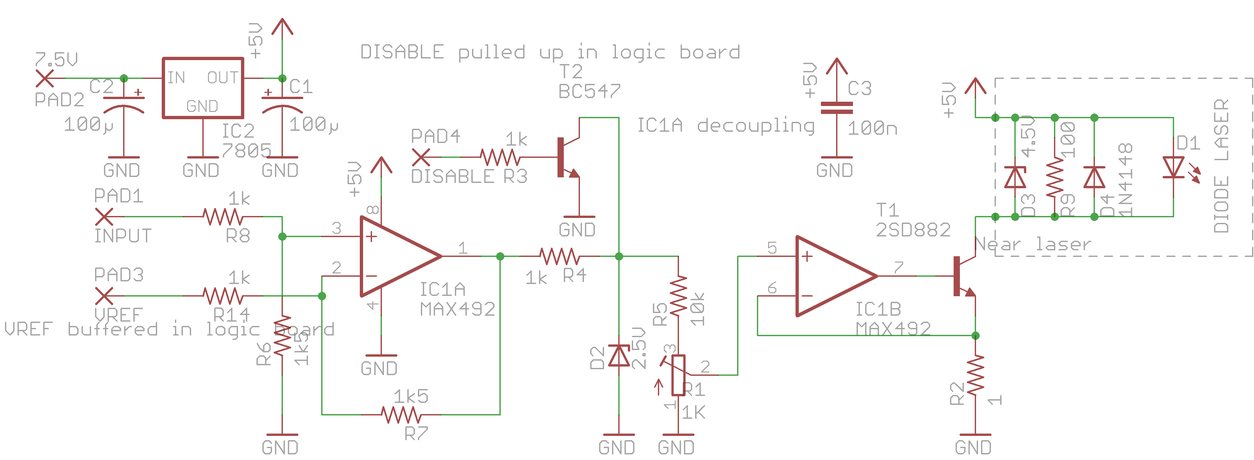
Driver schematic
The driver is a straightforward constant current driver with no optical feedback, inspired by the driver of the original pointer. A 7805 provides a stable 5V supply. The first op-amp subtracts out the VREF from the sound card DAC. A 2.5V zener provides a hard limit on the maximum current (regardless of input), and the actual value is adjusted by a pot. This goes into the second op-amp, which together with the output transistor and the current sense resistor performs the actual current regulation. Correction: the pot should be 5K, not 1K. That gives a maximum output of around 800mA.
If you’re wondering about the weird transistor (2SD882), the only reason I used that is that the original driver used it (a SOT223 version) and I happened to have the TO126 version in my junkbox. I’m sure tons of other power NPN transistors would work equally well. The op-amp is also not critical, this is just what I had in my junkbox (same goes for the buffer op-amp in the DAC board).
The plastic cover over the driver is a good idea to avoid screwdriver mishaps (I’ve killed a diode that way already). This design also has the unfortunate consequence that the 7805 heatsink is GND, while the NPN heatsink is the diode’s cathode, which means that if you short them together the diode gets 5V fed straight to it and will die in mere microseconds, hence the foam between them to attempt to reduce the chances of a straight object touching both at the same time.
Power supply
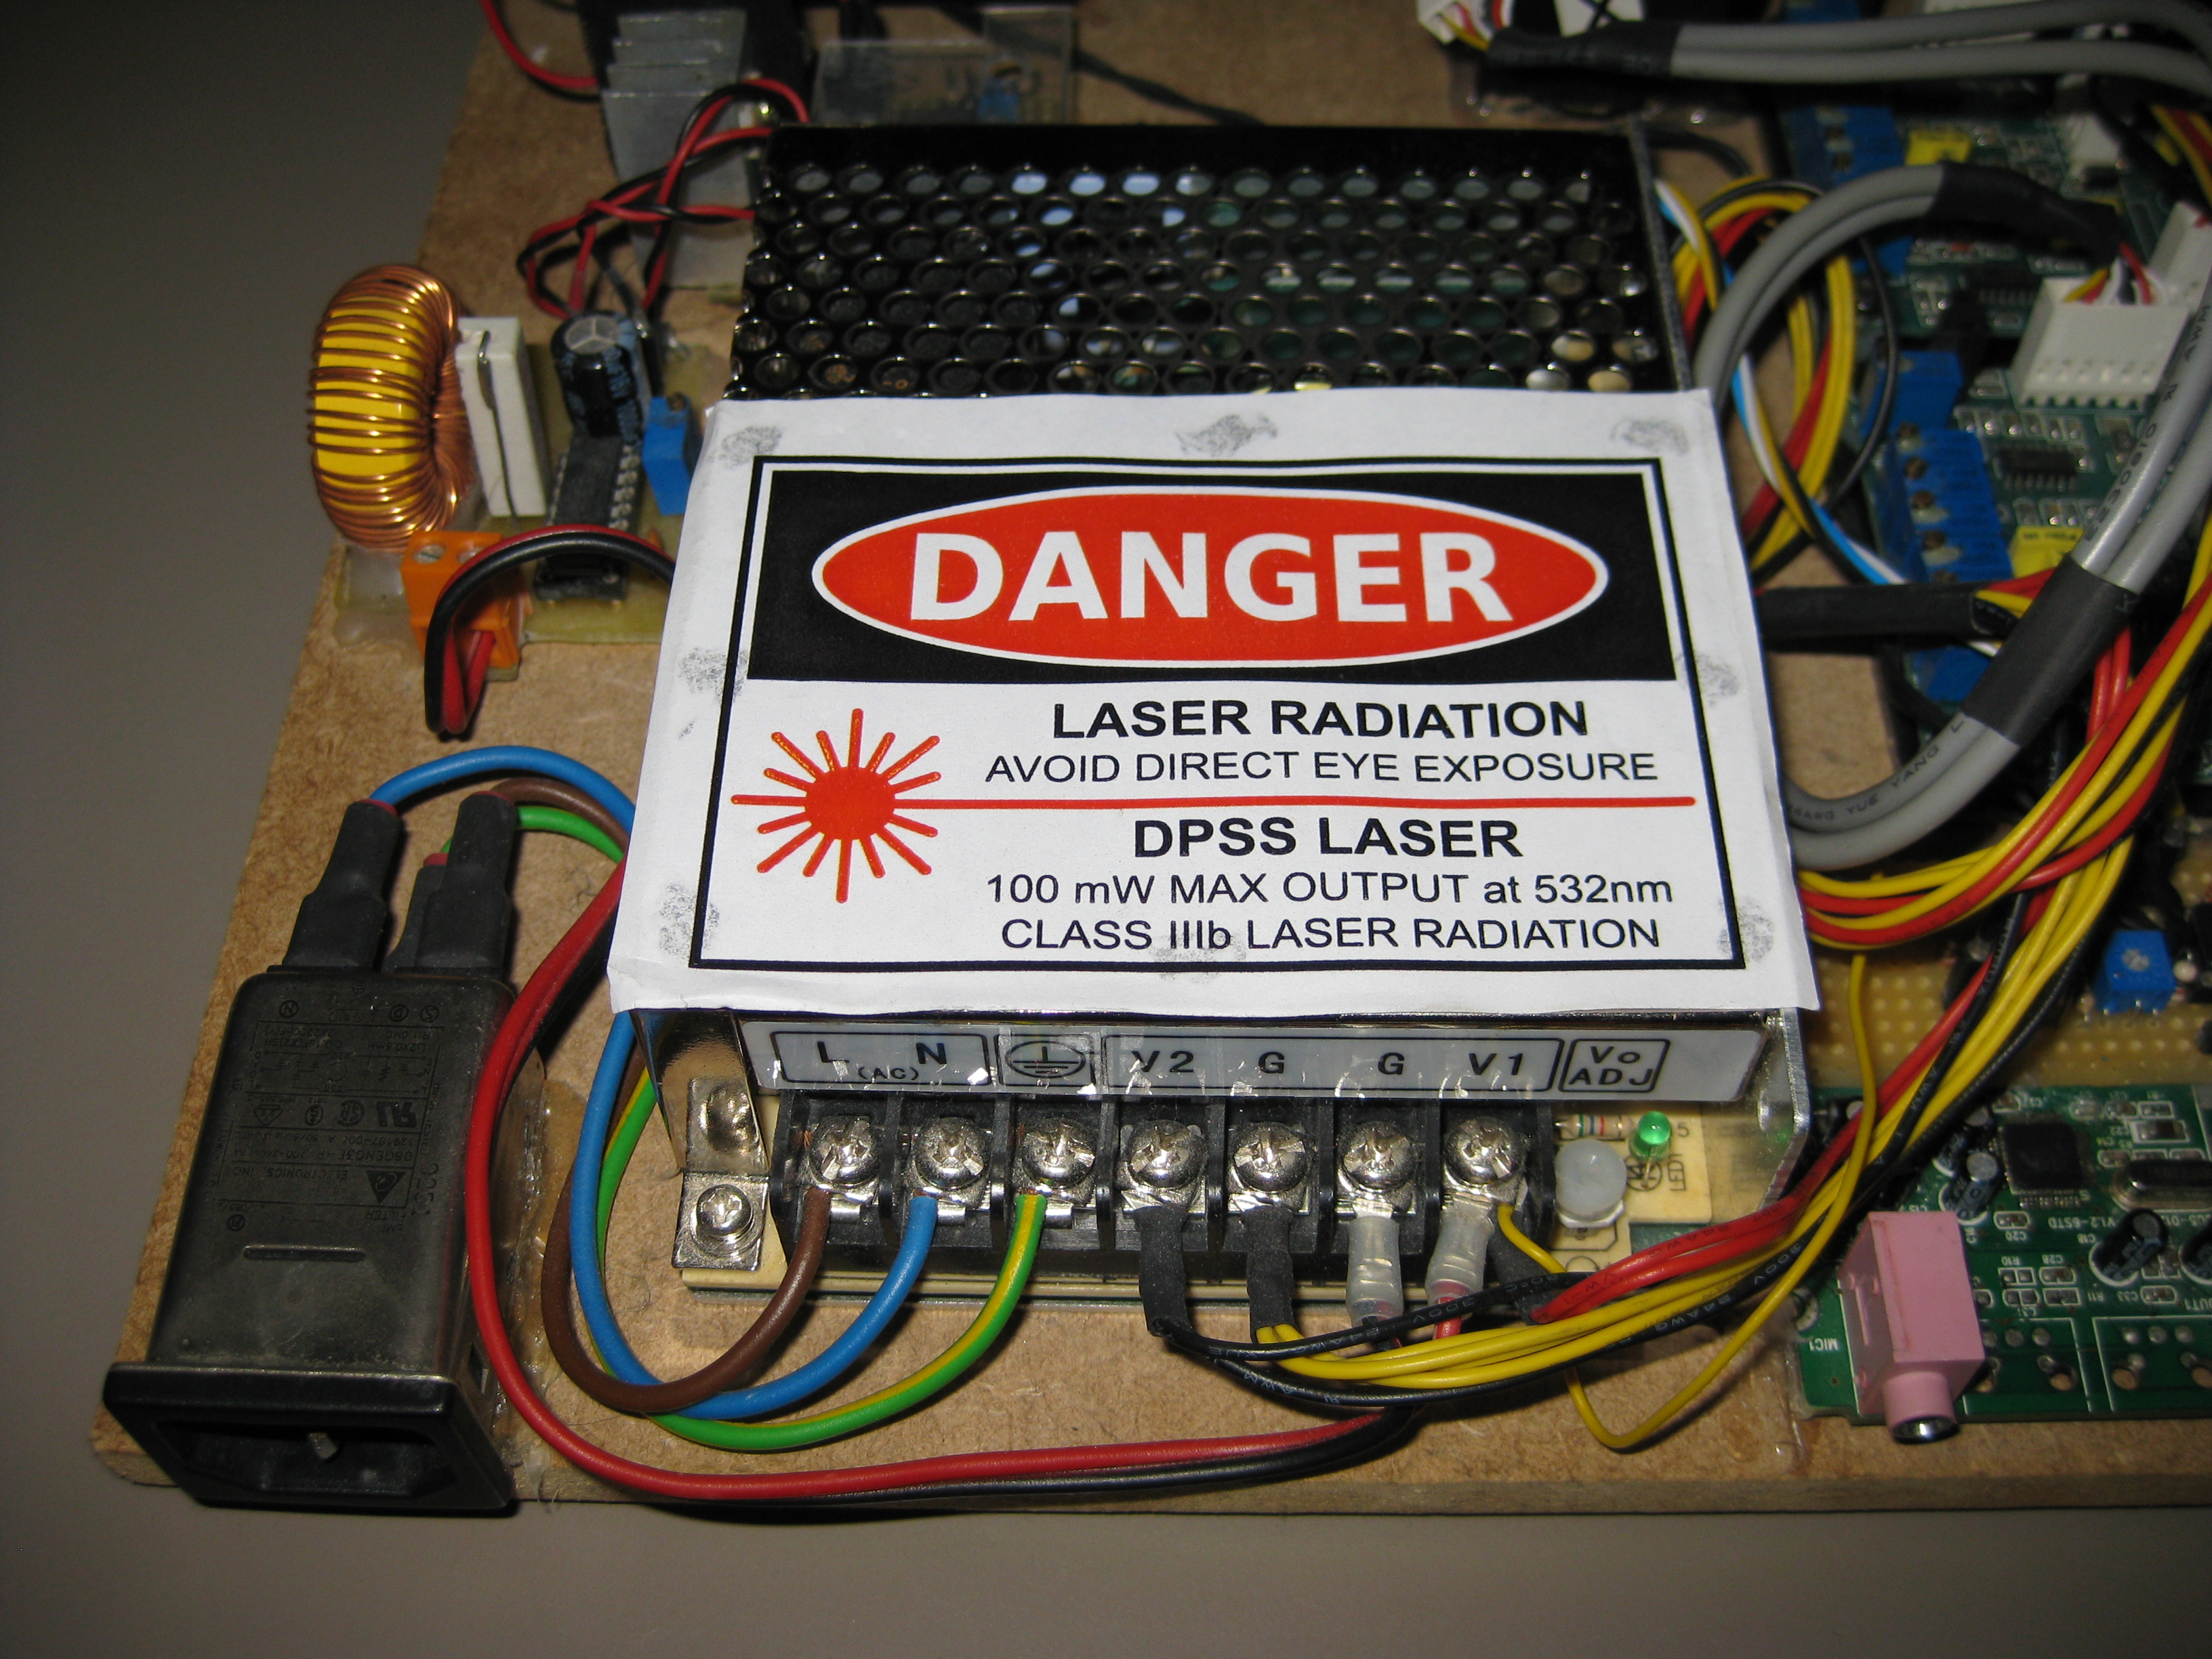
Power supply
This part is pretty trivial. The PSU provides power to the galvo amps and to the laser driver. This PSU actually came with the galvos, but I tapped off the +24V line and used an old DC-DC converter yanked out of an older project to produce 7.5V at a higher current, to supply the laser driver. It’s a very old design and it isn’t worth copying ;). If in doubt, I’d recommend just getting a separate supply for the laser (somewhere around 7.5V if you’re feeding the 7805 on the driver board, or you could just forgo the 7805 entirely and use a stable 5V supply). If you have two PSUs, make sure whatever you feed to the power monitoring input of the DAC board is the laser driver’s supply, since the laser is what we’re trying to protect from transients.
Hopefully this will have given you some ideas on how to build your own laser scanner! Remember, this is really just an example, and there are many things you can change. Good luck, and keep your eyes safe! ;)